

Most pruners do not run on a replacement schedule. They run on whether they still cut cleanly, and that depends more on how you have cared for them than how many seasons they have logged. A neglected pair can feel finished after one summer. A maintained pair lasts for years.
So before you shop for a new pair, it helps to ask the real question hiding behind the search: is mine done, or just neglected? Most of the time, the answer is closer to neglected than you would guess.
This guide walks through how to tell the difference, when repair or sharpening is the smarter move, and when a tool has reached the end. If you want to browse upkeep tools as you read, our plant care and accessories collection is a good starting point.

How Long Pruners Typically Last
Lifespan depends on the tool's tier, and the gaps are wide. Budget anvil pruners, where a single cutting blade closes against a flat counter blade, often give you one to three seasons before the blade pits or the spring fails. Mid-range bypass pruners, where two blades pass each other like scissors, run five seasons or more with basic upkeep.
Premium hand pruners built around replaceable parts can last effectively forever if you maintain them. The number worth remembering is not a fixed age. It is the fact that maintenance, not the calendar, decides where any tool lands in that range.
It also helps to be clear about what “lifespan” measures. It is not whether the pruners can still physically open and close. A rusty, stiff pair will still close. Lifespan measures cut quality and reliability, which is to say whether the tool still does the job a sharp tool is supposed to do.
A few variables compress or extend that window. Cut volume matters, as does plant type, since green stems are gentler on blades than woody growth. Storage conditions and cleaning habits matter every bit as much. A tool left damp in a shed wears faster than one wiped and dried after every session.
Signs Your Pruners Need Attention
The clearest signals come from the cut itself, the mechanism, and the metal. Read all three before deciding anything.
Cut Quality Has Declined
Cut quality is the first thing to slip and the easiest to ignore. Watch for stems that get crushed or torn instead of sliced, and for strands of plant fiber left hanging so you have to take a second pass.
There is a plant-health cost here beyond the annoyance. A ragged cut leaves a wound that browns and invites disease, while a clean cut heals faster and cleaner. If your cuts have started bruising stems, the blade is telling you something.
Mechanical Problems
Mechanical trouble shows up in how the tool moves through the stroke. A few patterns to check for:
-
Stiff, sticky, or grinding action as the blades close
-
Blades that no longer pass cleanly on a bypass pair, or no longer seat flush on an anvil pair
-
A weak, slow, or dead spring return
-
A loose pivot bolt that will not hold tension even after you tighten it
Some of these are repairable in minutes. Others point toward the end. The next sections sort out which is which.
Material Damage
Material damage is where you separate cosmetic wear from the real thing. Light surface rust and a few scratches are fine and clean off easily. Deep rust pitting on the cutting edge is not, because the pits stay even after cleaning.
The disqualifying problems are structural. Chips, nicks, or a rolled edge that sharpening cannot fully restore, a cracked handle, or a bent blade all sit in the replace column. A tool can look rough and still work. A tool with a cracked frame cannot.

Repair and Maintenance Before Replacement
This is where readers save or spend real money, so it is worth slowing down. Before you write off a pair of pruning shears, run through cleaning, sharpening, and parts in that order.
Cleaning and Rust Removal
Sap and plant residue are the most common false signal of a dead tool. The buildup gums up the action and dulls the blades, and once you scrub it off, the pruners often feel close to new again. A quick wipe-down after each use prevents most of it.
Light rust is reversible too. Surface oxidation comes off with fine sandpaper or a vinegar soak, and once the metal is clean and dry, a drop of oil on the moving parts keeps it from coming back.
Carbon steel blades hold an edge well but will rust if left wet, and even stainless steel still oxidizes, only more slowly. Skip WD-40, which attracts grit and can pit the metal. Reach for mineral, camellia, or linseed oil instead.
Sharpening
A dull blade is the most common reason a tool feels finished, and it is usually the easiest to fix. How often you sharpen depends on how much you cut, but a pass with a sharpening stone, hand file, or whetstone at the start of the season restores most edges.
Sharpening has a limit, though. When the edge chips repeatedly, when you have ground away so much steel that the geometry is gone, or when the blade will not hold an edge after sharpening, the steel is past saving. That is the line between a tool you maintain and one you replace.
Replaceable Parts
The repair math changes entirely once parts come into play. Springs, pivot bolts, and on better tools the cutting blades themselves can be swapped out, which means a worn component does not condemn the whole tool.
Design is what makes this possible. Pruners held together with nuts and bolts can be taken apart and serviced, while sealed budget units held together with rivets cannot. Garden-tool makers who build for disassembly are designing for a longer life, and that design difference is worth weighing at purchase, not only at repair.
When Repair Isn’t Worth It
Repair stops making sense when the cost of parts and your time starts approaching the price of a comparable new tool. If a replacement spring, a new blade, and an afternoon add up to most of what a fresh pair would cost, buy the fresh pair.
The other dealbreaker is damage to non-serviceable parts. A cracked handle, a bent frame, or a fixed blade that cannot be removed all end the conversation. A simple rule of thumb: if the repair runs past half the cost of replacing the tool, or if the broken part cannot be replaced, it is time.

How to Decide: Replace, Repair, or Maintain
Here is the whole framework in the order you should run it. Each question hands you off to the next only if the answer is no.
-
Does a good cleaning restore performance? If yes, you only needed to maintain it.
-
Does sharpening bring the edge back? If yes, maintain or lightly repair and keep going.
-
Can a worn part be replaced affordably? If yes, repair it.
-
Is the damage structural or the part non-serviceable? If yes, replace the tool.
Most cuts and stiffness clear up at the first two steps, which is exactly why “is mine done, or just neglected?” is the right opening question.
The branch you land on, though, depends heavily on what you bought in the first place. A repairable tool keeps offering you the cheaper options further down the list. A sealed budget pair runs out of branches fast.
Choosing Replacement Pruners That Last Longer
When a tool has reached the end, a few purchase criteria stack the odds toward a longer second life. Look for the right cutting style for your work, replaceable-blade construction, quality steel, and a comfortable grip that spares your hands on long sessions.
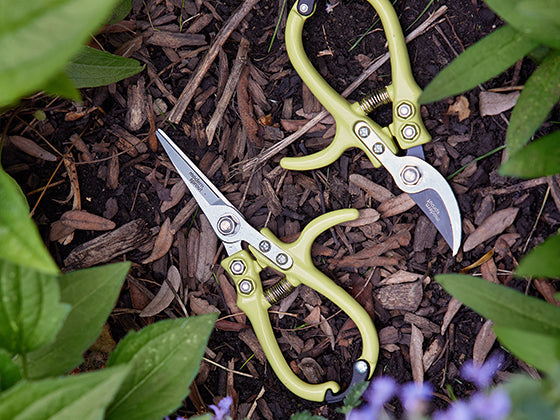
Matching the tool to the task is the criterion people skip most. Light work like deadheading, herb harvesting, and grooming houseplants calls for a fine, precise blade, while woody shrubs and small branches need a sturdier bypass cut. A single tool that covers both ends is rare, which is why some designs split the job.
Modern Sprout’s gardening shears and pruners take that split-the-job approach within one tool by offering two blade styles. The shears use a needle-nose tip for delicate stems, houseplant grooming, herb harvesting, and deadheading. The pruners use a bypass blade that handles flexible stems, small branches, and hedge trimming, with the capacity to cut up to half an inch in diameter.
Both run on high carbon steel and an ergonomic, non-slip handle, indoors or out. If you want to compare durable options side by side, the Gardener’s Toolshed collection is the browse path for it.
The point is to buy on durability criteria rather than on feature lists. Steel quality, the right blade style for your plants, and a handle that does not fatigue your grip will tell you far more about how long a tool lasts than any spec sheet.
Caring for Pruners to Maximize Lifespan
The fastest way to replace pruners less often is to make each pair last. The routine breaks down into three habits, and together they pay for themselves in seasons of extra use.
-
After each use, wipe and dry. Clear any sap, wipe the blades down, and dry them fully before they go back into storage. Skipping the dry step is how surface rust starts.
-
Periodically, service the moving parts. Oil the pivot so the action stays smooth, sharpen on a seasonal schedule, and check that the pivot bolt still holds tension.
-
Store dry and disinfect between plants. Keep tools out of a damp shed or soil, and wipe the blades with isopropyl alcohol or a diluted bleach solution before moving to the next plant. That last step ties back to cut health, since clean blades stop you from carrying disease from one plant to the next.
For more on technique, our guide to perennial pruning pairs well with this routine, and our how-tos for harvesting cover where fine shears earn their keep.

The Real Test for Worn Pruners
Replacement is rarely about age. It is about whether cleaning, sharpening, and a possible part swap can still bring back a clean cut, and only when they cannot does a new tool make sense. Run the four-question check before you spend, and most of the time you will find the tool was neglected rather than dead.
The longer-term lever is what you buy and how you treat it. A repairable tool maintained with a quick wipe, a seasonal sharpen, and a dry shelf will outlast several cheaper pairs bought to replace each other.
Spend once on something serviceable, keep up the routine, and “when should I replace my pruners” becomes a question you ask a lot less often.
